


AI in Revit with
BIMLOGIQ Copilot
AI in Revit with
BIMLOGIQ Copilot
AI in Revit with
BIMLOGIQ Copilot
Automate the boring. Create the bold.
Automate the boring. Create the bold.
Automate the boring. Create the bold.
Visit from your desktop to download the Revit add-in directly.
Visit from your desktop to download the Revit add-in directly.
Autodesk Revit
Autodesk Revit
Trusted by 100+ brands worldwide
Trusted by 100+ brands worldwide
Trusted by 100+ brands worldwide
Trusted by 100+ brands worldwide
Automate Use Cases with Prompts. No Code Needed.
Automate Use Cases with Prompts. No Code Needed.
Automate Use Cases with Prompts. No Code Needed.
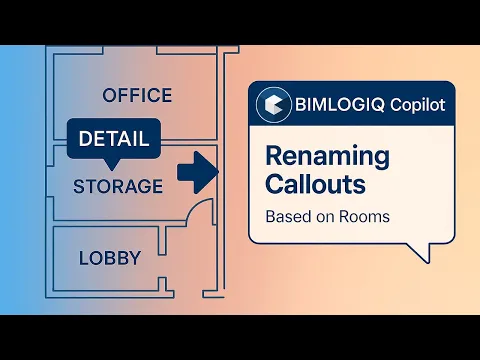
View Management
Prompt
Rename all callouts in this view based on the rooms they are located in, and add the room name as a suffix to the existing name.
Workset Management
Prompt
Remove
BMLQ-Arc-from the beginning of all workset names and set all worksets to be visible in all views. Then, for each element visible in the current view, retrieve its category name and assign the element to the workset whose name includes the corresponding category name.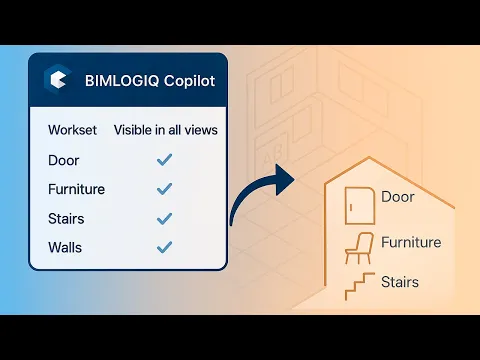
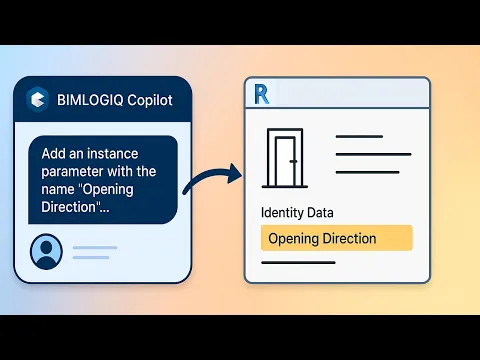
Parameter Management
Prompt
Add an instance parameter with the name of "Opening Direction" in text type in Identity Data group in each family whose name starts with "Door" then load back the family in project.
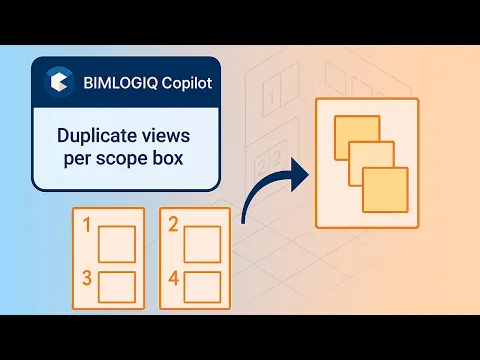
Project Setup
Prompt
For each scope box in this view, duplicate the current view as dependent, set the crop region based on the scope box region, and assign the view template 'ScopeBoxTemplate'
Excel Data Integration
Prompt
Open Plumbing Fixtures Asset Info.xlsx from
C:\Test. Match each Plumbing Fixture’s Mark with Column A and import the corresponding Asset Number from Column B into the model.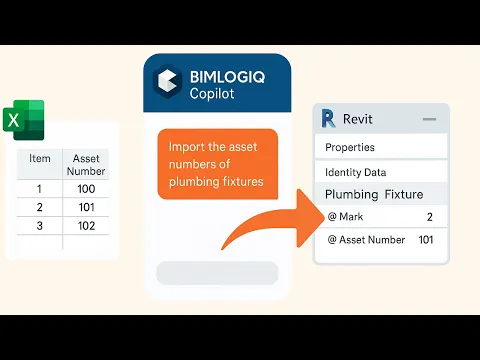
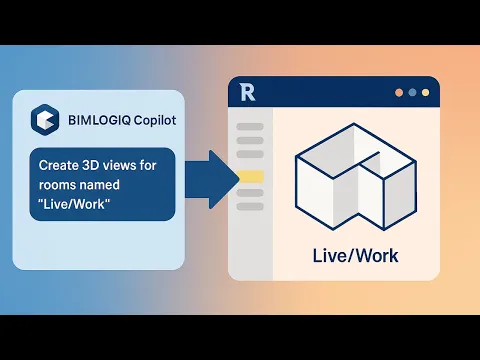
View Management
Prompt
Create a 3D view with a 3D section box for each room that has 'Live/Work' in its name (with a margin of 0.5 m). Set the height of each section box to 2 meters
Visualization & QA
Prompt
For each wall in this view, assign a unique color with a <Solid fill> to the cut patterns based on its Fire Rating value.

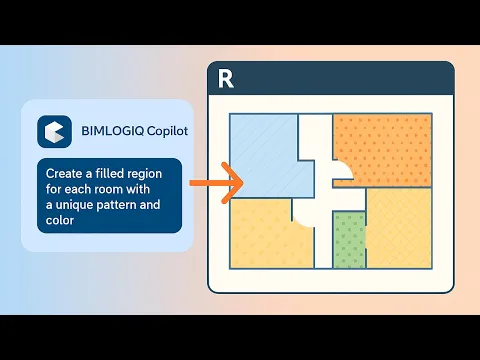
Visualization & QA
Prompt
Create a separate filled region for each room in this view, assigning a unique fill pattern and color based on its name.
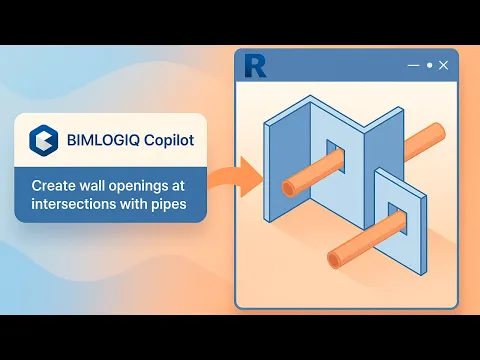
Architectural Modeling
Prompt
Create wall openings in size of pipes at intersection of walls and all pipes in this project.
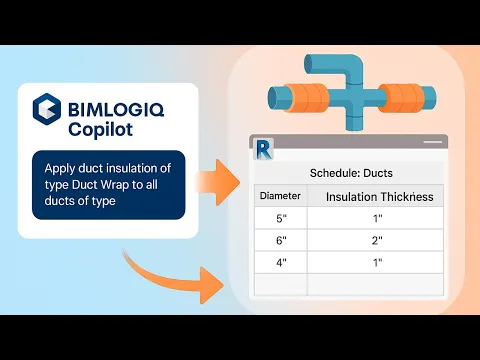
MEP Modeling
Prompt
Apply duct insulation of type Duct Wrap to all ducts of type Tees in the current view. For ducts with a System Type of "Supply Air," use 2-inch insulation if the duct diameter exceeds 5 inches. If the diameter is 5 inches or smaller, use 1-inch insulation instead.
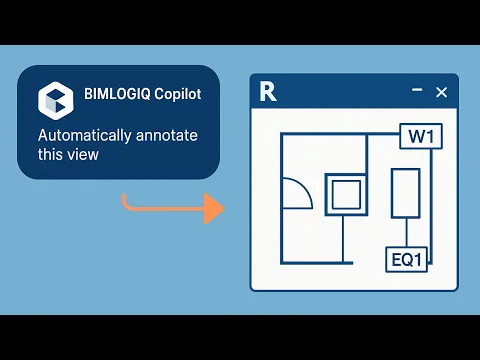
Tagging
Prompt
Public Command
Parameter Management
Prompt
In the selected space, please read the Specified Supply Airflow and divide it by the number of air terminals in that space with a "Supply Air" System Type. then, enter calculated value into the Flow parameter for each air terminals.

Structural Modelling
Prompt
Switch the join order between all structural columns and all floors. Check it between all Structural columns and all floors.

Structural Modelling
Prompt
For each structural beam, calculate the number of studs using the formula:
Number of Studs = floor(("Cut Length" - 100) / 400) + 1,
then write the result into the "Number of Studs" parameter.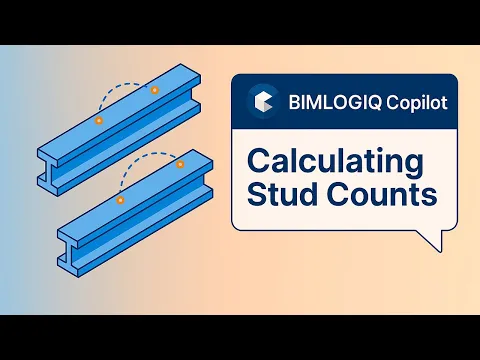
View Management
Prompt
Rename all callouts in this view based on the rooms they are located in, and add the room name as a suffix to the existing name.
Workset Management
Prompt
Remove
BMLQ-Arc-from the beginning of all workset names and set all worksets to be visible in all views. Then, for each element visible in the current view, retrieve its category name and assign the element to the workset whose name includes the corresponding category name.Parameter Management
Prompt
Add an instance parameter with the name of "Opening Direction" in text type in Identity Data group in each family whose name starts with "Door" then load back the family in project.
Project Setup
Prompt
For each scope box in this view, duplicate the current view as dependent, set the crop region based on the scope box region, and assign the view template 'ScopeBoxTemplate'
Excel Data Integration
Prompt
Open Plumbing Fixtures Asset Info.xlsx from
C:\Test. Match each Plumbing Fixture’s Mark with Column A and import the corresponding Asset Number from Column B into the model.View Management
Prompt
Create a 3D view with a 3D section box for each room that has 'Live/Work' in its name (with a margin of 0.5 m). Set the height of each section box to 2 meters
Visualization & QA
Prompt
For each wall in this view, assign a unique color with a <Solid fill> to the cut patterns based on its Fire Rating value.
Visualization & QA
Prompt
Create a separate filled region for each room in this view, assigning a unique fill pattern and color based on its name.
Architectural Modeling
Prompt
Create wall openings in size of pipes at intersection of walls and all pipes in this project.
MEP Modeling
Prompt
Apply duct insulation of type Duct Wrap to all ducts of type Tees in the current view. For ducts with a System Type of "Supply Air," use 2-inch insulation if the duct diameter exceeds 5 inches. If the diameter is 5 inches or smaller, use 1-inch insulation instead.
Tagging
Prompt
Public Command
Parameter Management
Prompt
In the selected space, please read the Specified Supply Airflow and divide it by the number of air terminals in that space with a "Supply Air" System Type. then, enter calculated value into the Flow parameter for each air terminals.
Structural Modelling
Prompt
Switch the join order between all structural columns and all floors. Check it between all Structural columns and all floors.
Structural Modelling
Prompt
For each structural beam, calculate the number of studs using the formula:
Number of Studs = floor(("Cut Length" - 100) / 400) + 1,
then write the result into the "Number of Studs" parameter.View Management
Prompt
Rename all callouts in this view based on the rooms they are located in, and add the room name as a suffix to the existing name.
Workset Management
Prompt
Remove
BMLQ-Arc-from the beginning of all workset names and set all worksets to be visible in all views. Then, for each element visible in the current view, retrieve its category name and assign the element to the workset whose name includes the corresponding category name.Parameter Management
Prompt
Add an instance parameter with the name of "Opening Direction" in text type in Identity Data group in each family whose name starts with "Door" then load back the family in project.
Project Setup
Prompt
For each scope box in this view, duplicate the current view as dependent, set the crop region based on the scope box region, and assign the view template 'ScopeBoxTemplate'
Excel Data Integration
Prompt
Open Plumbing Fixtures Asset Info.xlsx from
C:\Test. Match each Plumbing Fixture’s Mark with Column A and import the corresponding Asset Number from Column B into the model.View Management
Prompt
Create a 3D view with a 3D section box for each room that has 'Live/Work' in its name (with a margin of 0.5 m). Set the height of each section box to 2 meters
Visualization & QA
Prompt
For each wall in this view, assign a unique color with a <Solid fill> to the cut patterns based on its Fire Rating value.
Visualization & QA
Prompt
Create a separate filled region for each room in this view, assigning a unique fill pattern and color based on its name.
Architectural Modeling
Prompt
Create wall openings in size of pipes at intersection of walls and all pipes in this project.
MEP Modeling
Prompt
Apply duct insulation of type Duct Wrap to all ducts of type Tees in the current view. For ducts with a System Type of "Supply Air," use 2-inch insulation if the duct diameter exceeds 5 inches. If the diameter is 5 inches or smaller, use 1-inch insulation instead.
Tagging
Prompt
Public Command
Parameter Management
Prompt
In the selected space, please read the Specified Supply Airflow and divide it by the number of air terminals in that space with a "Supply Air" System Type. then, enter calculated value into the Flow parameter for each air terminals.
Structural Modelling
Prompt
Switch the join order between all structural columns and all floors. Check it between all Structural columns and all floors.
Structural Modelling
Prompt
For each structural beam, calculate the number of studs using the formula:
Number of Studs = floor(("Cut Length" - 100) / 400) + 1,
then write the result into the "Number of Studs" parameter.
Prompt It. Save It. Share It.
Prompt It. Save It. Share It.
Prompt It. Save It. Share It.
Automate your workflow with a prompt. Save the code for reuse and add variables when needed.
Automate your workflow with a prompt. Save the code for reuse and add variables when needed.
Automate your workflow with a prompt. Save the code for reuse and add variables when needed.
Learn more
Learn more
Chat
BIMLIGQ Copilot
How can I help you?
prompt
Create a 3D view for every room whose name contains “Live/Work”
BIMLOGIQ Copilot
Views created successfully.
Save as a command for future use and make room name variable

Edit Command
BIMLIGQ Copilot
Editing “Create 3D views”
What would you like
to change?
prompt
Only consider rooms with an area greater than 500 sq ft for renaming
BIMLOGIQ Copilot
Command updated.
…
Share
alex.taylor@example.com
riley.james@example.com
casey.wilson@example.com
Command Library

Create Sheets

Add Schedules

Adjust levels
Build Your Company Library with Generative AI
Build Your Company Library with Generative AI
Build Your Company Library with Generative AI
Create commands using prompts and save them to your company library. Or choose from over 50 ready-to-use public commands available in BIMLOGIQ Copilot.
Create commands using prompts and save them to your company library. Or choose from over 50 ready-to-use public commands available in BIMLOGIQ Copilot.
Learn more
Learn more
Learn more

Pipe Opening

Create or Update Sheets from Excel

Create Room Callout

Create Wall Section View

Datum Dimensioning

Delete Reference Planes

Duct & Floor Closest Distance

Element Associated Space/Room

Split Wall at Level

Split Duct To Fixed Length

Wall Dimensioning

Uniform Dimension Space

Split Column at Level

Split and Merge Dimensions

Sort Grid Naming

Tag and Arrange

Sheet Revision Report

Set Pipe Reference Level

Set Duct Reference Level

Selector Manager

Room Section Box

Room Dimensioning

Room Cut Sheet

Remove rooms from project.

Place Penetrations for Pipes

Hide Link Elements By Category

Find Duplicated and Overlapped Elements

Find and Rename Elements

Export/Import Schedule to/from Excel

Architectural Plan Dimensioning

Arrange Views On Sheet

Auto Numbering Elements in View

Clone Project Elements

Duct Opening
Pipe Opening
Create or Update Sheets from Excel
Create Room Callout
Create Wall Section View
Datum Dimensioning
Delete Reference Planes
Duct & Floor Closest Distance
Element Associated Space/Room
Split Wall at Level
Split Duct To Fixed Length
Wall Dimensioning
Uniform Dimension Space
Split Column at Level
Split and Merge Dimensions
Sort Grid Naming
Tag and Arrange
Sheet Revision Report
Set Pipe Reference Level
Set Duct Reference Level
Selector Manager
Room Section Box
Room Dimensioning
Room Cut Sheet
Remove rooms from project.
Place Penetrations for Pipes
Hide Link Elements By Category
Find Duplicated and Overlapped Elements
Find and Rename Elements
Export/Import Schedule to/from Excel
Architectural Plan Dimensioning
Arrange Views On Sheet
Auto Numbering Elements in View
Clone Project Elements
Duct Opening
Create commands using prompts and save them to your company library. Or choose from over 50 ready-to-use public commands available in BIMLOGIQ Copilot.
Learn more
Pricing
Pricing
Pricing
Monthly
Annual (Save 5%)
Monthly
Annual (Save 5%)
Monthly
Annual (Save 5%)
Monthly
Annual (Save 5%)
Free Trial
For 30 days
For 30 days
no credit card required
no credit card required
no credit card required
All BIMLOGIQ Copilot features
No credit card required
Regular updates and improvements
Email support
Individual/Team License
Ideal for single users or small teams (less than 20 users).
Enterprise License
Tailored for larger teams and organizations
Tailored for larger teams and organizations
Contact us
Contact us
Contact us
Contact us
Contact us
Contact us
for a custom quote
for a custom quote
for a custom quote
Priority support and troubleshooting
Customized onboarding and training
Scalable pricing for larger teams
All features of the Individual license
FAQ
FAQ
FAQ
How to activate my Copilot?
How does the save command work?
Can I use Copilot for tagging and dimensioning?
What kind of tasks can I ask Copilot to perform?
What are good prompt guidelines?
How to Smart Reference Using @?
What if Copilot BETA is not doing my command?
Can I share my saved commands with others?
What are Public Commands?
I have an issue activating my BIMLOGIQ Copilot. What should I do?
Learn more
Learn more
Learn more

Copyright © 2024 BIMLOGIQ
Contact Us: support@bimlogiq.com
Level 4/1 Castlereagh St, Sydney, NSW 2000
ACN 639 389 727
ABN 33 639 389 727
Copyright © 2024 BIMLOGIQ
Contact Us: support@bimlogiq.com
Level 4/1 Castlereagh St, Sydney, NSW 2000
ACN 639 389 727
ABN 33 639 389 727
Copyright © 2024 BIMLOGIQ
Contact Us: support@bimlogiq.com
Level 4/1 Castlereagh St, Sydney, NSW 2000
ACN 639 389 727
ABN 33 639 389 727
Copyright © 2024 BIMLOGIQ
Contact Us: support@bimlogiq.com
Level 4/1 Castlereagh St, Sydney, NSW 2000
ACN 639 389 727
ABN 33 639 389 727
Prompt It. Save It. Share It.
BIMLOGIQ Copilot
BIMLIGQ Copilot
How can I help you?
prompt
Create a 3D view for every room whose name contains “Live/Work”
BIMLOGIQ Copilot
Views created successfully.
Save as a command for future use and make room name variable
Automate your workflow with a prompt. Save the code for reuse and add variables when needed.
Build your command library. Run any task with a click.
Edit Command
BIMLIGQ Copilot
Editing “Create 3D views”
What would you like
to change?
prompt
Only consider rooms greater than 500sqf in Area for renaming
BIMLOGIQ Copilot
Your command updated.
Use prompts to edit commands and tailor them to your needs.
Share your workflows and collaborate with others.
Share
alex.taylor@example.com
riley.james@example.com
casey.wilson@example.com
Command Library
Create Sheets
Add Schedules
Adjust levels
Prompt It. Save It. Share It.
BIMLOGIQ Copilot
BIMLIGQ Copilot
How can I help you?
prompt
Create a 3D view for every room whose name contains “Live/Work”
BIMLOGIQ Copilot
Views created
successfully.
Save as a command for future use and make room name variable
Automate your workflow with a prompt. Save the code for reuse and add variables when needed.
Build your command library. Run any task with a click.
Edit Command
BIMLIGQ Copilot
Editing “Create 3D views”
What would you like
to change?
prompt
Only consider rooms greater than 500sqf in Area for renaming
BIMLOGIQ Copilot
Your command updated.
Use prompts to edit commands and tailor them to your needs.
Share your workflows and collaborate with others.
Share
alex.taylor@example.com
riley.james@example.com
casey.wilson@example.com
Command Library
Create Sheets
Add Schedules
Adjust levels